Monday 30 December 2013

Moving House!

When I moved house I went into slight panic mode....where would everything be? I thought about writing on the boxes - what was in each one but then how would I know where the box was as we where moving? (slight OCD there!)

I then came up with the idea of numbering each box and then creating a master list - On this list would be the number, what was inside the box, where the box should be put in the new house, a section to say if the box had been unpacked. I'm sure lots of people already do this and will not see this as the wonderful amazing idea that I did but hey! I was proud of myself! lol

This Idea worked really well especially as I was ill (not intentionally!) during quite a lot of the packing - James carried on my packing list ( although not in the detail I originally had! But it was ok!) which really helped when we moved in here - I could see where all my craft stuff was for a start! But it meant we had everything in the correct room as soon as we had moved in.

Click here to download the pro forma I used - I have given you just over 40 boxes to be getting on with! haha!

Christmas Fair crafts

 Our christmas fair creations! 
Every year my school run a christmas fair here are the samples I made to show them what we were going to create.... They LOVED creating them and I think they sold out within 5 mins! haha! I got the ideas from Pinterest -of course!

The Chocolate Reindeers 
  • An uncut piping bag - I got 30 from The Range for about £2.00
  • Hot Chocolate Powder
  • Marshmellows
  • Two googly eyes
  • 1 Pom Pom nose
  • and Two pipe cleaners to make the antlers
  • et volia!
  • A hot chocolate Reindeer!


Sock Snowmen!
1 child sized sock - pack of 15 at Asda for £2!
Polystyrene balls or rice
googly eyes
a pom pom nose
Scrap of material to make the scarf!


Bracelets!

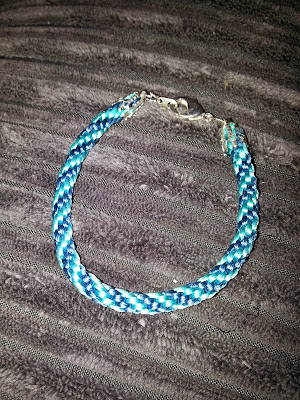
Here are two bracelets that I made this year for my Mum and soon to be Sister - in-law! ...


They are called Kumihimo ( Japanese Braiding) bracelets and are really easy to make when you have the correct equipment - the board is simple to use - I got my resources from the lovely Penny atPitstop X :) Penny also has a lovely shop on Etsy :) Her instructions are extremely clear and easy to follow! 

I think each braid took me 20min if that to create? A very effective and easy pressi to make!

Arm knitted scarf!

I made lots of these for people this year! They are soooooo soft and comfy! Very quick and easy to make too even Pebbles the rabbit wanted to be involved! Tehe!


I only had to watch it once and I was away!
I even made one on the way home in the car ( James was driving!!! :O) - a 20 min journey!

Sunday 29 December 2013

Mr snowman!

Here is a Christmas pressie that I made for my Nan and Grandad....they never really want anything for Christmas or birthdays so I thought this could be a little ornament for Christmas!

Here is what i used to make him:-
  • DAS  white air drying clay - 1/4 of a 1kg packet,
  • A cocktail stick to hold his head on!
  • Black bead for his eyes, mouth and buttons
  • A long orange bead for his carrot nose! 
  • Brown pipe cleaners for his arms
  • Red and green pipe cleaner for his little scarf!
I think he is very cute and obly took me 10 mins to make....just waiting for him to dry so that I can wrap him up ready for his journey to his new home tomorrow!


Mr Snowman update!!
He went to his new house today! My Nan and Grandad loved him! He is pride of place on their mantle-piece! 

Saturday 28 December 2013

New Home! New Year!

I have just moved house :) Our very first house :) In previous rented properties we haven't really bothered with unpacking everything or organising everything to much as we knew we would not be living there for long! But now I am getting organised :) James is not quite as enthusiastic as me but hey! Haha! I will try and add some photos of what we have achieved when I have time!

I have seen lots of 'Home Binder' pins on Pinterest and have now made my own :) Some Binders have bank account info and passwords in... I have decided not to do this as well.... if it gets in the wrong hands - thief or something.... well that would be sooooo helpful for them!!! Haha!

I will be adding a few other bits and pieces in here over the next few days or so but this is how far I have got so far! Please feel free to download and edit for your selves :) They are very simple at the mo  and as they are done on a Mac they may open a bit strange on a normal desktop - I will rectify this when I find my charger for my windows laptop!!! - I think it is in a box....somewhere....possibly number 24! :)


Click here to download your own copies!


I hope you all have had a lovely Christmas and you have a Successful New Year!

Lis
xx


I have already added cleaning and maintenance schedule (weekly, monthly and 6 monthly) and a work info file and a vet profile! ....

Sunday 22 December 2013

Christmas!

I am currently making all my pressies for Christmas! I will post them on here after i have given them out! just in case sneaky people look! Trying a couple of new projects this year :)

Sunday 10 November 2013

Presentation Certificate

Here are the mini certificates that go with my earlier presentation board post :) sooooo cute!

Presentation board

This is my new presentation board to go with my mini presentation certificates.... If children present their work to a high standard they can place their photo onto the board and are given a mini certificate to take home...I will be adding a title to I will upload the picture after I have completed it.

Thursday 17 October 2013

New posts coming soon!

Sorry! I haven't posted on here for a while :( I have had a very busy few weeks at school!! But, this week I have created lots of certificates for my class ready to be posted on here at the weekend! 

Sunday 1 September 2013

My handmade behaviour chart!

I have spent most of today making a fabric version of my behaviour chart... 
here is the link to my old one Click here to see  

It is based on the Clip chart Click here to view

All of my bits and pieces ready... It will be the first time that I have used the Silhouette Cameo to cut fabric!


First I cut out all the different coloured fabrics that I needed 
Then I designed my writing for each section using my Silhouette Software - I originally wanted to cut my lettering out with felt but it REALLY didn't work - I think it was the felt more than the machine - I even had the silhouette interfacing stuck on! In the end I went with cotton fabric - this worked well :) 
I noticed that with the facing it is best to let is cool a bit before pealing off the backing.


Once I had placed all the writing in the correct place I was going to applique it to the chart - this didn't look very nice :s 
So.... I unpicked it and decided to use fabric glue instead :) 
Next I pinned the chart to the black felt the wrong side out and then used my sewing machine to sew the two materials together. 


Finally I ironed the chart and here is the finished article! What do you think? I can't wait to use it in my classroom! 


Reindeer Beer!

I LOOOOVVVEEEEEE these cute Reindeers!

I saw the idea when i was searching the web for reindeer pics for school...all the people that recived them thought they wer soooooo cute (even my Dad)

Homemade Hand Scrub

Another gift that I made for Christmas last year was this lovely soothing hand scrub...
To find the recipe Click Here

Amazing what you can make with just normal sugar!!!!

Hand made Bath Bombs


Last Christmas I made these Yummy Bath Bombs - Everyone loved them! I also used them as end of year gifts for my work colleges this year!

To get the recipe click here... 

I just added some Rose Buds and Lavender oil in mine

Fairy Coasters

Cute coasters that I made for some of my friends this year...
How To Make Your Own!

You will need :-

  • Your choosen papers
  • Tiles
  • Ruler
  • Pencil
  • Glue - Modge Podge was used for the photo
  • Resin -Water resistant/heat proof 


1) Choose the papers that you would like to have as your tile background,
2) Cut the paper to size using the tile as a guide - it works best if you cut the paper just smaller than the tile this way you do not get any flappy edges,
3) Next glue the paper to your tile - I used Modge Podge for my tiles,
4) Once the paper had dried cover the paper and tile in a few layers of Modge Podge - I found this helped to seal the tiles and stopped the paper from bobbling,
5) Once the tiles are completely dry cover the tile in resin - I used waterproof resin for mine as I wanted them to be used for drinks etc,  - I used 3 coats of resin to make sure that mine were completely resistant


Save The Date!

My final finished Save The Date cards ready to be sent out!

The day the machine arrived!!!

My Silhouette Cameo in the box.... I forgot to upload it the day it came! Bit of back posting!

Hot Bunnies!

The Bunnies today decided it was far toooooooo hot to play!! instead they sat next to an ice bottle...

Oooooh Watermelon!!!!!

Today the Rabbits found my left over watermelon.They LOVED it. Only let them eat a tiny bit as from looking online they are allowed to eat it but only in small amounts...Pebbles went searching for it after I threw it away...

Saturday 31 August 2013

Birthday card

My first birthday card using my silhouette! Loved picking out the different colours to layer the cake! I have also worked out my perfect card cut setting is blade on 3 and thickness 20! Yey no more fighting with fiddly bits on the cutting mat!!!

Wednesday 21 August 2013

First project complete

I have completed my first project on my cameo!
I am sooo happy with how it turned out...it is my card to ask our best man to be part of our wedding-what u think?

Monday 19 August 2013

Silhouette Cameo

well......I have been ummming and arrrrrring for a while now about buying a Silhouette Cameo. A few yeas back I brought a Sizzix Big Shot (electronic) machine and I loved it, I made lots of beautiful cards with it but after a while I felt a bit limited, I wanted to make things for my class room so I needed them on a large scale. My beautiful Big Shot ended up collecting dust as my card making moved onto Decoupage and stamping.
The the Sizzix Eclips machine was announced - this got my attention, but I couldn't afford it :(
Christmas 2012 my partner James asked me to marry him :) of course I said yes!!!!!! But that left me wanting to make my own invitations, decorations, names cards etc after 6 months of browsing the internet looking at reviews and research i found the Silhouette Cameo.....LOVE AT FIRST SIGHT!

I wouldn't let my self buy it due to the price tag but James basically forced me!  I brought it last week and it finally arrived on Saturday - I couldn't wait to get started! I have had so much fun doing mini projects and I have now started my Save The Date cards. I will post them when finished!


Friday 26 April 2013

Thursday 25 April 2013

Celebration area

Better view of the area

Early morning work

New early morning work station. Been working well this week!! Children being very independent learners. Will upload templates to tpt store at weekend :)

New behaviour management area

New area ready to go when the kids come back!

Monday 1 April 2013

TPT store!

Just started my TPT store - not uploaded anything yet, but I am planning to over the next few weeks :)

http://www.teacherspayteachers.com/Store/Xx-Lisa-Marie-Xx

Friday 29 March 2013

Pebbles and Flopps

I have sent off my order via Vista Print - cards
Will be part of my new reward system when we got back! very excited!

Can't wait to show the children after Easter!

my first post!

Not really sure what to write on here! It is my first post and i'm still trying to work out how to use everything!